Members of Fraserburgh Photographic Society will be offering tips on getting better photographs on this page. So keep coming back to this page for the latest 'tip'
Monochrome |
Presentation from the Monochrome session on 24 January 2020
|
. |
Focus Stacking
How to get a photo that is in focus in the background and the foreground.
Here are two photos of Mormond Hill I took the other day. For one I focused on the foreground twisted tree trunk. For the other I focused on Mormond Hill in the background. For the camera settings I went for a narrow aperture (a high number f stop). to get a big depth of field and lots of the photo in focus. Here I have a foreground and a background and not much in the middle so two shots works fine. If you have more middle distance interest then take more shots to get that in sharp focus.
Here are two photos of Mormond Hill I took the other day. For one I focused on the foreground twisted tree trunk. For the other I focused on Mormond Hill in the background. For the camera settings I went for a narrow aperture (a high number f stop). to get a big depth of field and lots of the photo in focus. Here I have a foreground and a background and not much in the middle so two shots works fine. If you have more middle distance interest then take more shots to get that in sharp focus.

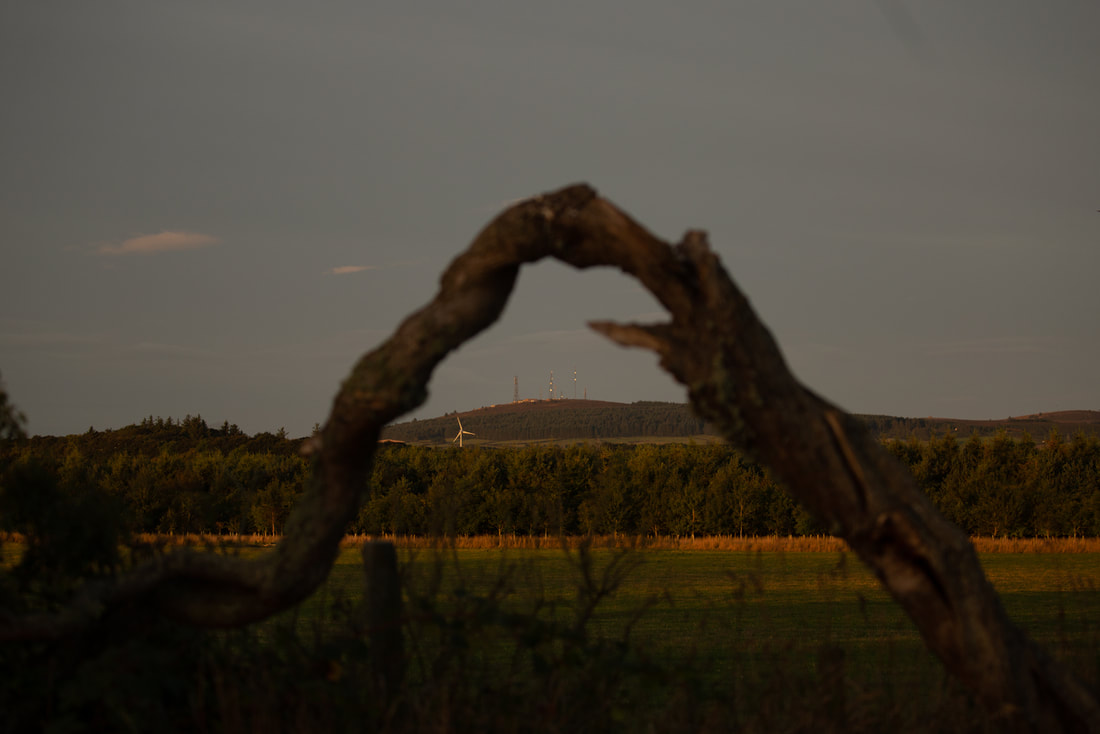
It is best to take the shots using a tripod so that they are aligned. With this subject because of the clear outline of the tree I shot hand held an aligned the images in Photoshop and it did a good job.
Here is the final image which as well as merging the two I took I have given a bit of a tweak in Lightroom to brighten it up and bring out more detail.
Here is the final image which as well as merging the two I took I have given a bit of a tweak in Lightroom to brighten it up and bring out more detail.

Rather than go through the Photoshop focus stacking process in detail here is a link to the tutorial that I used. I am sure that other photo programs will do the same thing so if you don't do photoshop do a bit of googling to find one that will work for you. CombineZP is free and well thought of. There are phone apps available too.
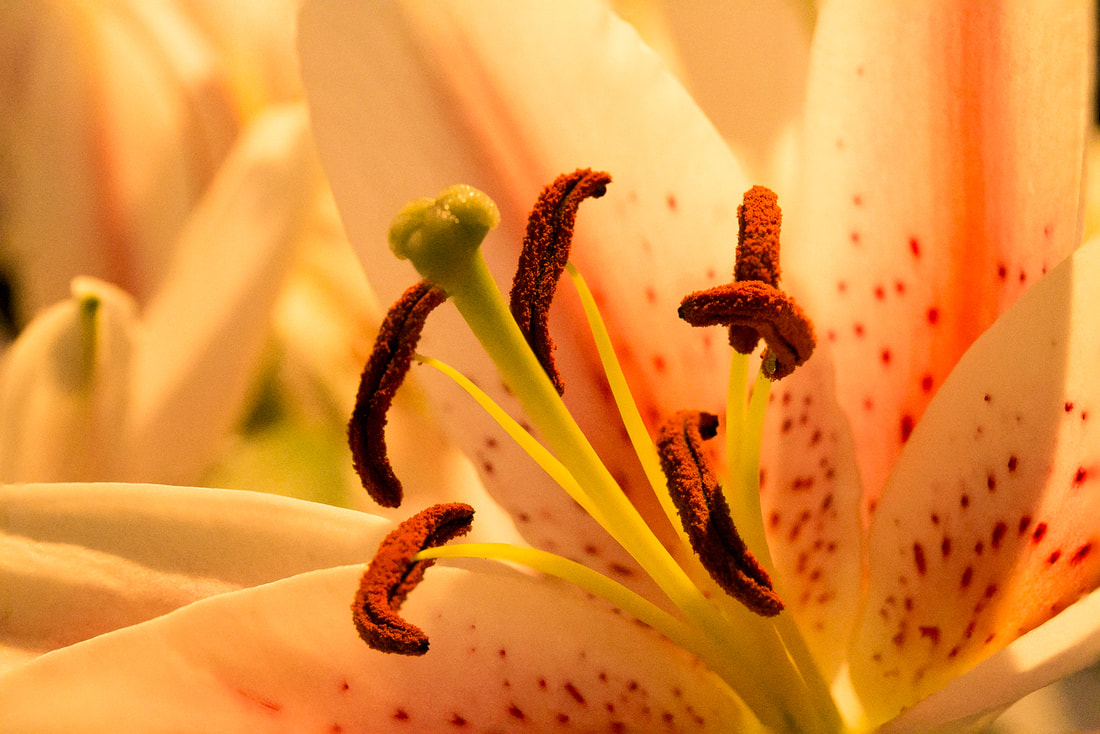
This is just a start. A lot of people use focus stacking for macro photography taking lot of close up images and merging them into one that is in focus from front to back. Here is a series of images I took of a lily with the focus on different parts of the flower.
This is just a start. A lot of people use focus stacking for macro photography taking lot of close up images and merging them into one that is in focus from front to back. Here is a series of images I took of a lily with the focus on different parts of the flower.
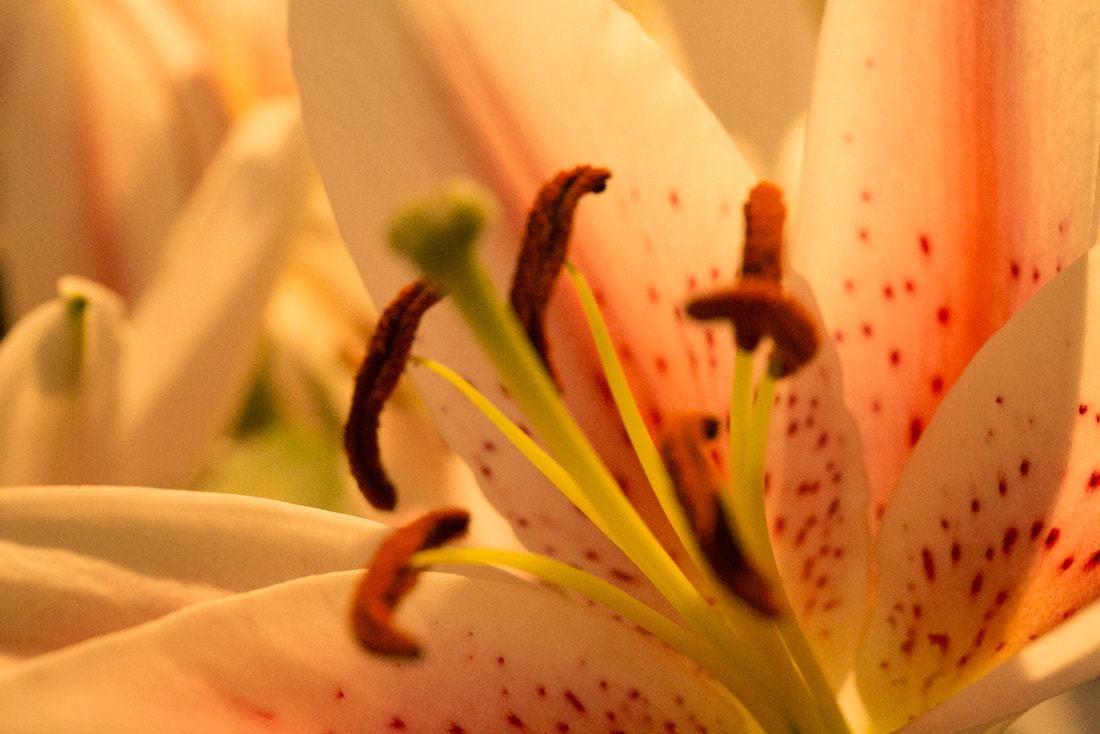

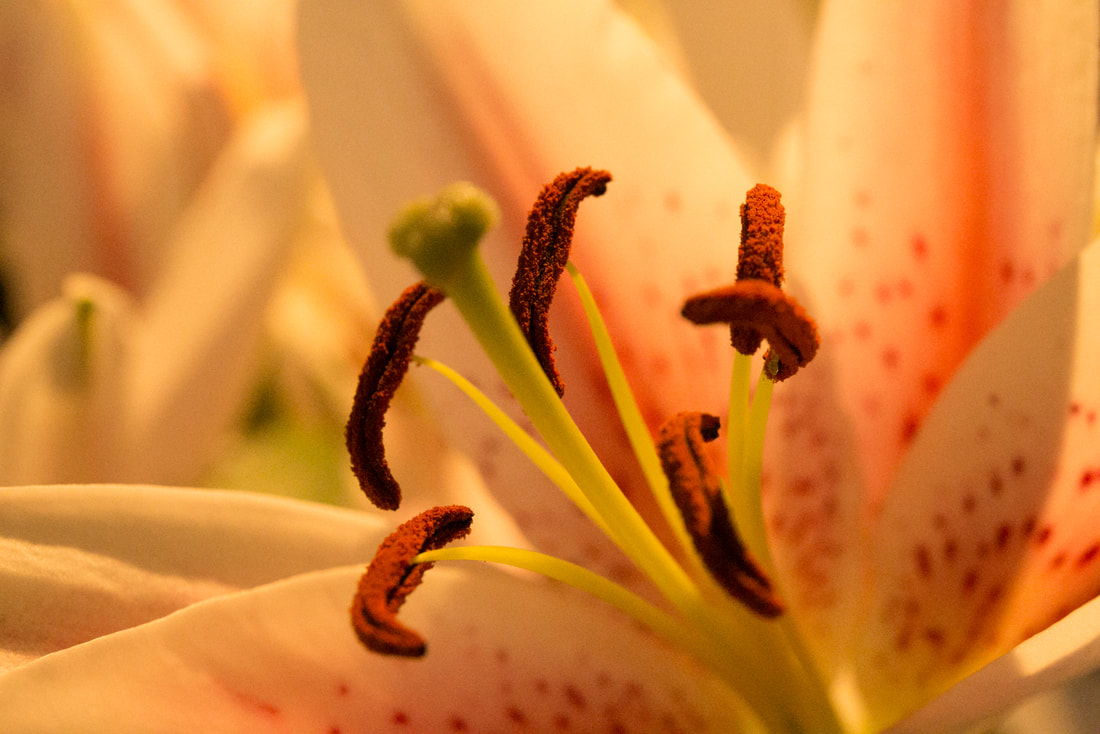
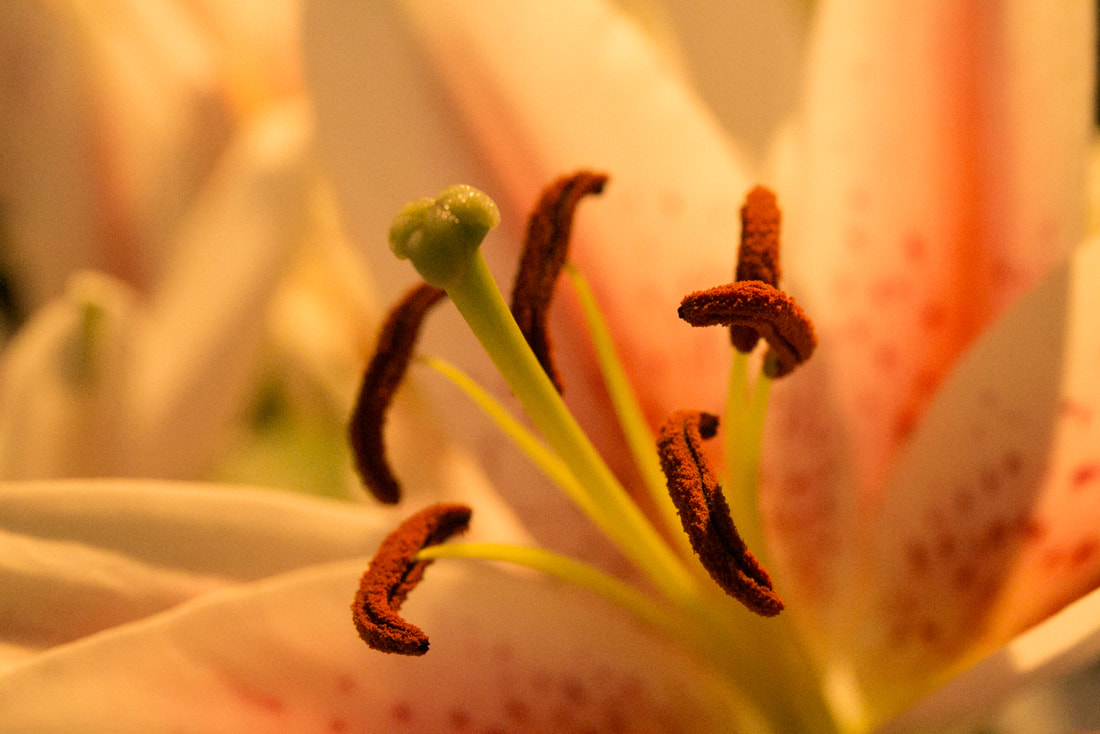
...and here is the focus stacked final image. I could have taken more images with the background on the top left in focus but I wanted to concentrate on the stigma and anthers. Good luck with your focus stacking and post your results on the Fraserburgh Photographic Society Facebook page.
6 Tips about Composition for Landcapes
These tips have been taken from Pic Monkey and was written by Loretta Grande is a photographer and graphic designer. To see more of Loretta’s work, check out her Instagram:@lorettamgrande.
1 Use the Rule of Thirds
Photographers of all stripes use the rule of thirds to guide their compositions. The rule basically trashes the idea of framing your subject dead centre. If you imagine dividing your image into thirds, vertically and horizontally, the most appealing images have focal points where two of these lines intersect. That’s why many DSLR cameras show the grid in the viewfinder. When composing landscape shots, one of my first considerations is where the horizon line is. If the most interesting part of the shot is the land, I’ll compose my shot so that two thirds of the shot is land, and one third is sky. For shots in which the most dramatic part of the shot is the sky, then I want two thirds sky and one third land.
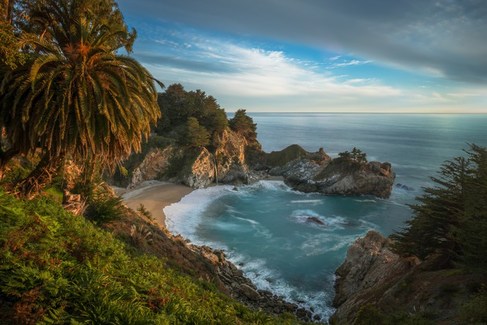
2 Use Trees or Plants to Frame the Picture
Framing is about using objects in the foreground to frame a point of interest in the background but it’s also about accentuating the landscape. Foliage is your friend! Positioning trees, plants, or other vertical features lets the landscape help you frame the shot.
3. Accentuate a point of interest in the foreground
1 Use the Rule of Thirds
Photographers of all stripes use the rule of thirds to guide their compositions. The rule basically trashes the idea of framing your subject dead centre. If you imagine dividing your image into thirds, vertically and horizontally, the most appealing images have focal points where two of these lines intersect. That’s why many DSLR cameras show the grid in the viewfinder. When composing landscape shots, one of my first considerations is where the horizon line is. If the most interesting part of the shot is the land, I’ll compose my shot so that two thirds of the shot is land, and one third is sky. For shots in which the most dramatic part of the shot is the sky, then I want two thirds sky and one third land.
2 Use Trees or Plants to Frame the Picture
Framing is about using objects in the foreground to frame a point of interest in the background but it’s also about accentuating the landscape. Foliage is your friend! Positioning trees, plants, or other vertical features lets the landscape help you frame the shot.
3. Accentuate a point of interest in the foreground
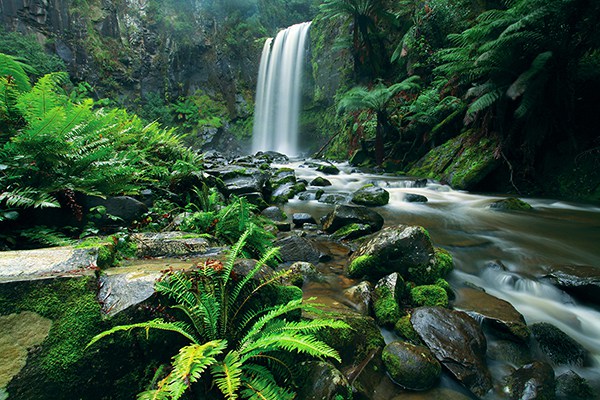
This particular forest is known for its lush flora, so the shot is framed in a way that the ferns in the foreground are set against the waterfall. Creating a vivid foreground adds depth to the shot.
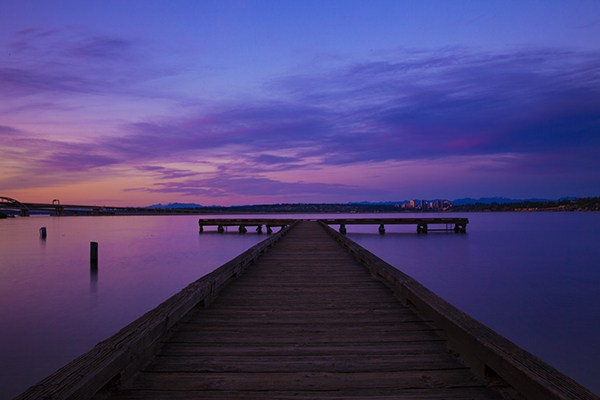
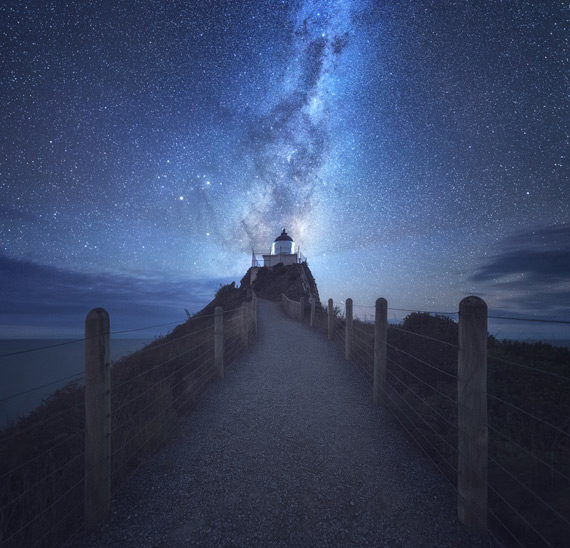
4. Create a vanishing point
The vanishing point in any picture is the point at which two parallel lines appear to converge. Medieval painters used vanishing points to simulate three dimensions, making objects smaller and smaller in relation to it. In photography, framing the shot to create a vanishing point adds drama and draws the eye into the shot.
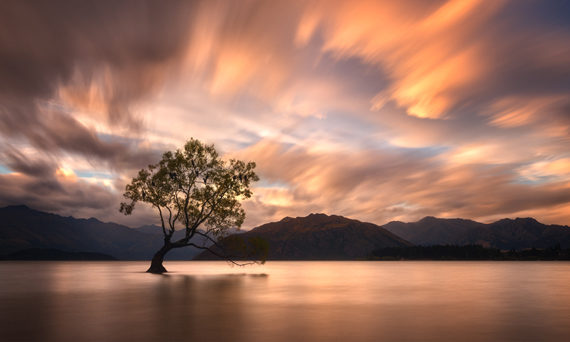
5. Use diagonal lines
Diagonals add movement to your photo, drawing the viewer’s eyes into the scene. They can create points of interest, and emphasize the distances between objects in the foreground and background, which adds depth.
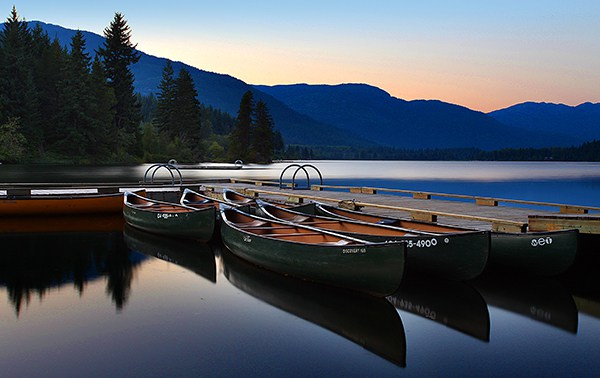
6. Reflect the beauty
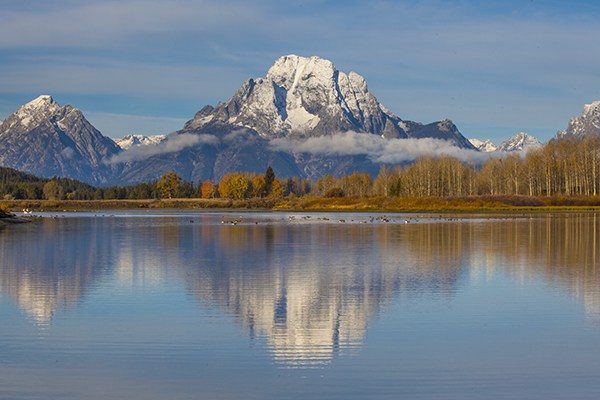
Reflections are a perfect example of the cardinal rule that rules are meant to be broken: showing the horizon line in dead centre can be appealing, contrary to the rule of thirds. I like how the reflected scenery adds a painterly texture and abstract playfulness to the image.
6. Reflect the beauty
Reflections are a perfect example of the cardinal rule that rules are meant to be broken: showing the horizon line in dead centre can be appealing, contrary to the rule of thirds. I like how the reflected scenery adds a painterly texture and abstract playfulness to the image.
Here is a bonus tip from Fraserburgh Photographic Society
Make sure horizons are horizontal and verticals are vertical.
Make sure horizons are horizontal and verticals are vertical.
Advanced Focusing Tips
These tips are taken from 'Digital Photogrphy School' and were written by James Brandon
'One very common question I get from photographers is why they can never get their images as sharp as the ones they see online. This is a loaded question, and it really made me think about all the things I go through to get tack sharp focus on my images. Sure there are the obvious tips like holding the camera properly, squeezing the shutter instead of stabbing it, tucking your elbows in, and so on. The truth is, that is just the beginning to taking sharper photographs.
Let me start off by saying that I still take blurry images from time to time. All professional photographers do. The only difference is that we don’t post them online! However, I will also bet that I take far less than most other photographers, and there are clear reasons as to why. Getting sharp images involves a combination of a few different techniques, and when put together they will produce a far higher success rate of sharp images.
Back Button Auto-Focus
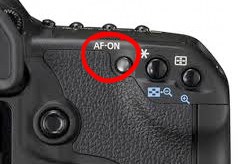
Back Button Auto-FocusI can honestly say that about 90% of the photographers I talk to don’t use this built in feature on almost all cameras. Whenever I ask photographers how they focus on a subject, the response is that they press the shutter half way down to focus, then all the way down to take the picture. The problem with this is that EVERY time you take a picture, your camera is going to re-focus the frame. What if your subject is a far away person and there is a crowd of people walking between you? You can’t just set your focus distance and fire away. Instead you have to wait for line of site to your subject and hope nobody walks by while you focus each time.
On most (nearly all) cameras, there is a button on the back of the camera titled “AF On.” Through your menu settings, you can set this button as your focus trigger. This way, you set your focus then fire off as many shots as you need to. The focus point stays the same through all shots and the shutter is free to be used as just that, a shutter.
On most (nearly all) cameras, there is a button on the back of the camera titled “AF On.” Through your menu settings, you can set this button as your focus trigger. This way, you set your focus then fire off as many shots as you need to. The focus point stays the same through all shots and the shutter is free to be used as just that, a shutter.
Single Point AF

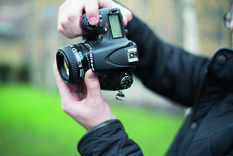
One of the many revelations that photographers have is discovering the difference between letting your camera decide how to do something, and telling your camera what to do. Most photographers press their shutter down halfway and the camera decides what to focus on. More often than not, it picks the right thing. This is normally because the subject is prominent in the frame and the camera can easily find a contrasting element to focus on. Using this simple method is fine in a lot of cases, but if you begin to venture into prime lenses and shallow depth of fields, your images will begin to suffer greatly. If your subject is 10 feet away and you’re shooting f/2.8 at 200mm, your depth of field is only 1 1/2 inches deep! That means that your subject will come into focus at 9.94 feet away, and drop out of focus at 10.06 feet away. Do you want to leave a 1.5 inch depth of field up to your camera? What if it focuses on the tip of the nose? Now your subjects eyes are out of focus.
Your camera should have a button (top right in image) that shows how the camera is focusing. The default is to have all the focus points on and the camera uses those points to decide where to focus. Instead, press the focus grid button and use the joy stick (bottom left in image) to decide where to set your focus point. Instead of a bunch of focus points popping up when your go to focus your subject, you will now only see the single focus point that you set. Now if you want to focus on your subjects eye, place your selected focus point over the eye and simply tap your AF-ON button. Your focus is now set for that mark in the frame. The only thing you need to worry about now is movement.
Your camera should have a button (top right in image) that shows how the camera is focusing. The default is to have all the focus points on and the camera uses those points to decide where to focus. Instead, press the focus grid button and use the joy stick (bottom left in image) to decide where to set your focus point. Instead of a bunch of focus points popping up when your go to focus your subject, you will now only see the single focus point that you set. Now if you want to focus on your subjects eye, place your selected focus point over the eye and simply tap your AF-ON button. Your focus is now set for that mark in the frame. The only thing you need to worry about now is movement.
AI Servo Focus Tracking
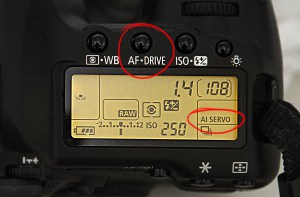
Funny name, serious setting. Getting your camera off of “One Shot” can be revolutionary to your photography if you have yet to discover Servo focus mode. Here’s an example of how Servo works: You’re shooting a wedding during the end of the ceremony. You are at the end of the aisle and the wedding party is walking down toward you. You are shooting at f/2.8 because it’s dark and you want to let in as much light as possible. Your depth of field is 6 inches. With “One Shot,” your camera only focuses on the subject each time the focus button is pressed. You then have to press the shutter to take the picture. With a depth of field of 6 inches, and the wedding party walking towards you in groups of two, your window of opportunity to get your shot in focus is incredibly small. One strategy is to just try and be quick, pressing the focus button and shutter in succession as quickly as possible. Another strategy is to set a mark on the aisle as a window of opportunity and wait for each person to hit that mark, then take the picture. This is hit or miss though, and you only have one chance. You don’t want to take chances like this at a wedding!
Enter AI Servo
When you switch your camera over to AI Servo, everything changes. Servo was introduced as a standard camera setting all the way back in the 80’s, by request of several sports photographers who needed a better way of ensuring focus on moving subjects. With Servo activated, now your camera will track focus on the wedding party as they move toward you, and will keep updating every step of the way. This works whether the subject is coming toward, or moving away from you. In your menu settings, you can even adjust the sensitivity of the focus tracking.
When you switch your camera over to AI Servo, everything changes. Servo was introduced as a standard camera setting all the way back in the 80’s, by request of several sports photographers who needed a better way of ensuring focus on moving subjects. With Servo activated, now your camera will track focus on the wedding party as they move toward you, and will keep updating every step of the way. This works whether the subject is coming toward, or moving away from you. In your menu settings, you can even adjust the sensitivity of the focus tracking.
Examples Using These Tips
1

This shot is from a meet and greet session with the band Jars of Clay, at a concert in Austin, Texas. The manager told everyone not to worry about taking pictures until after the show because any meet and greet pictures would be boring. I took that as a challenge. I sat patiently for the right moment and when I saw their lead singer make eye contact with my lens, I fired away.
With normal focus methods, this shot may not have been possible, and I don’t like taking chances. If I used grid focus, how would my camera know to focus on HIS face, and not something else in the frame? Instead of using the entire focus grid, I turned on a single auto focus point and placed that point over the lead singers face. I then used my back button to focus that point over his face and waited for the right moment. When he looked my way, everything was already done, all I had to do was hold down the shutter.
2

This is one of my favourite pictures I’ve taken. It’s my nephew Will being spun around by his dad Billy (my brother in law). I think the image embodies the love between a father and a son, and what better backdrop than fair grounds? With factory set focus methods, the probability of pulling off this shot would have been slim to none. Sure, you can spray and pray, and hopefully you will end up with a keeper, but what if you don’t? The moment is gone! For this shot, I had a single point activated in my focus grid and used AI-Servo to track my nephew as he spun around in circles. Because I had back button auto focus on and Servo tracking, I was able to hold down the focus button to track focus as he spun around. This allowed me to track focus using my thumb and hold down the shutter with my index finger. Trust me, this stuff becomes crucial when you start using shallow depth of field like in this shot.
3
3
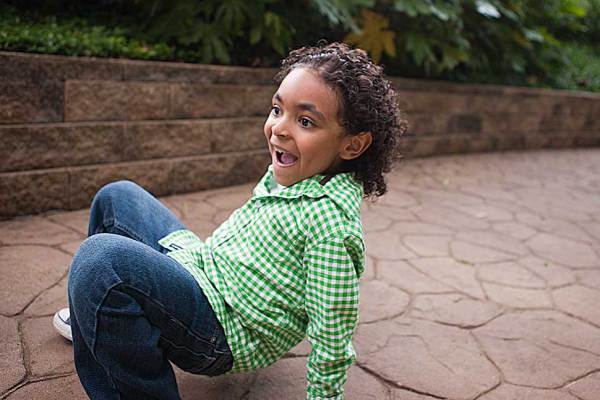
I took this shot during a family shoot last spring. I was having a tough time getting this little guy to open up to the camera and I had to figure something out quick. I noticed a ledge (as seen in the background) and made a bet with him that there was just no way he could jump off that ledge because it was only for big boys. Well, that was all it took! Within seconds he was up on the ledge with a smile on his face, ready to prove me wrong. Again, I used Servo focus tracking and held it down during the jump using back button focus. I grabbed this frame as he made a bit of a rough landing.
4
4
I took this shot during a family shoot last spring. I was having a tough time getting this little guy to open up to the camera and I had to figure something out quick. I noticed a ledge (as seen in the background) and made a bet with him that there was just no way he could jump off that ledge because it was only for big boys. Well, that was all it took! Within seconds he was up on the ledge with a smile on his face, ready to prove me wrong. Again, I used Servo focus tracking and held it down during the jump using back button focus. I grabbed this frame as he made a bit of a rough landing.
Conclusion
These focus tips completely rocked my world when I discovered them, and they will always be part of my work flow, now and in the future. I probably use AI Servo about 90% of the time. The only time I don’t is when it’s too dark for the camera to focus without an assist beam from a flash. To use a flashes focus assist grid you have to be in “One Shot” instead of AI Servo (at least as far as I can tell). I don’t see any reason to ever go back to using my shutter button for focusing. I have never looked back on that front! And as far as grid or single point AF goes, it’s pretty much the same story. I use my entire grid maybe 1% of the time.
If these tips are new to you, I urge you to stop what you are doing and give them a shot. I will admit, using back button focus and single AF points takes some getting used to, but eventually it becomes second nature. At this point, I can switch focus points on my grid in the blink of an eye, and using the back button for focus is instrumental in placing those points of focus on their targets.
Shutter Speed Cheat Sheet
Here is an article from Digital Photography School
A Post By: Viktor Elizarov
To take your photography to the next level and achieve perfectly exposed photos, it’s important to understand and master shutter speed and its relationship to Exposure. However, what’s even more exciting and challenging is using shutter speed as an artistic tool to achieve stunning effects.
Whether you want to master shutter speed as part of Exposure Triangle or use it artistically, the Shutter Speed Cheat Sheet makes things much easier!
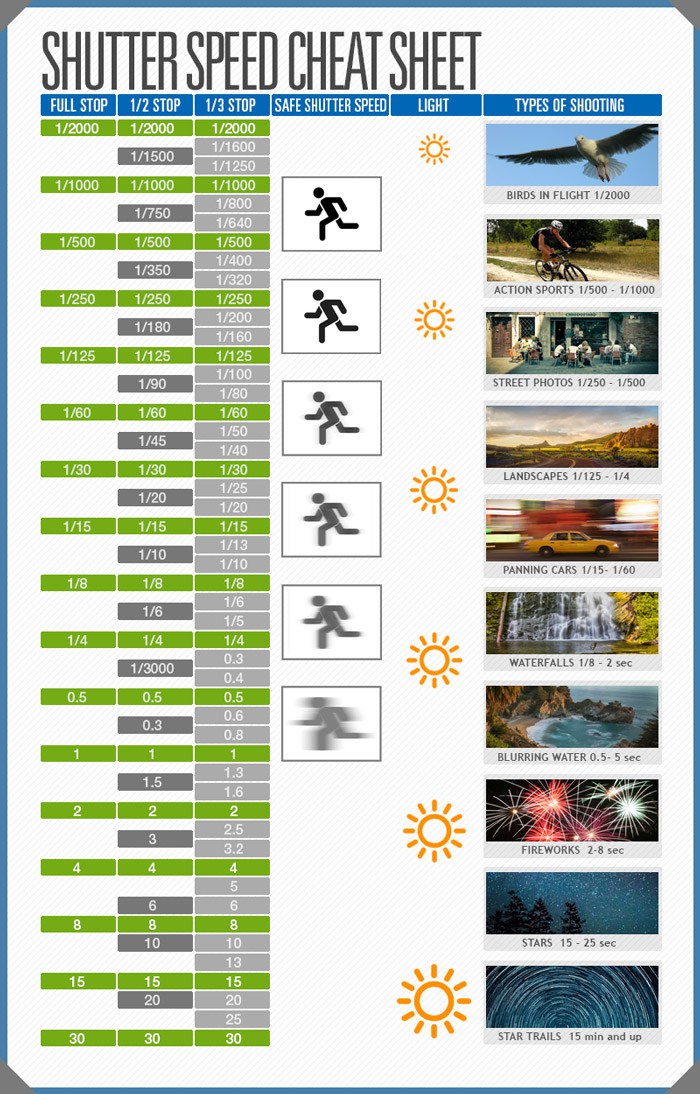
Full Stop, ½ Stop, 1/3 Stop
The equation behind the relationship between Exposure and Shutter Speed is straightforward; by doubling or halving the shutter speed you are changing the exposure value by 1-stop. However, the introduction of digital cameras changed everything by no longer restricting how much we can change the shutter speed. Some cameras allow us to change the speed by half or even a third of a stop. Use the Shutter Speed Cheat Sheet to help you estimate and calculate your exposure.
Safe Shutter Speed
Using the right shutter speed is vital in photographing moving objects. Look at the Shutter Speed Cheat Sheet to see how speed directly affects image sharpness.
Light
The Cheat Sheet illustrates how a faster shutter speed means that less light reaches the camera sensor and a longer shutter speed means that more light reaches the sensor.
Artistically Shooting with Shutter Speed Cheat Sheet
Birds in Flight 1/2000
Wildlife photographers typically use a 1/2000th of a second shutter speed to ensure birds in flight are sharp. Ultimately, you can reduce the speed to 1/400th to give the bird a sharp body and blurry wings.
Action Sports
Shutter speed is crucial in fast-moving sports like football and soccer where a shutter speed between 1/500th and 1/1000th freezes the action to create crisp and sharp images.
Street Photography 1/250th – 1/500th
Most streets are in constant movement with pedestrians and vehicles. That is why shutter speed is critical to produce the right exposure and to avoid soft or blurry images.

Street Photography 1/250th, f/8, ISO 100.
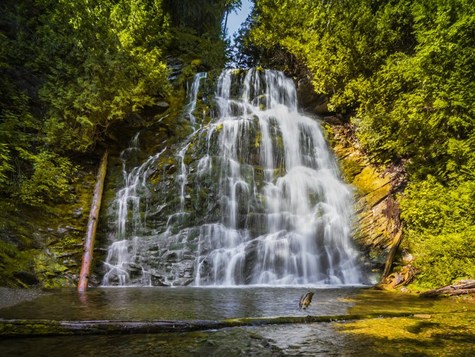
Landscapes 1/125th – ¼
Shutter speed varies across landscapes and techniques. When using a tripod, a slower shutter speed of 1/8th or ¼ of a second is acceptable. However, to avoid blurry images when shooting hand held, you need to use a faster shutter speed.
Shutter speed varies across landscapes and techniques. When using a tripod, a slower shutter speed of 1/8th or ¼ of a second is acceptable. However, to avoid blurry images when shooting hand held, you need to use a faster shutter speed.
Landscape 1/125th, f/8, ISO 100.
Panning Cars 1/15th – 1/60th
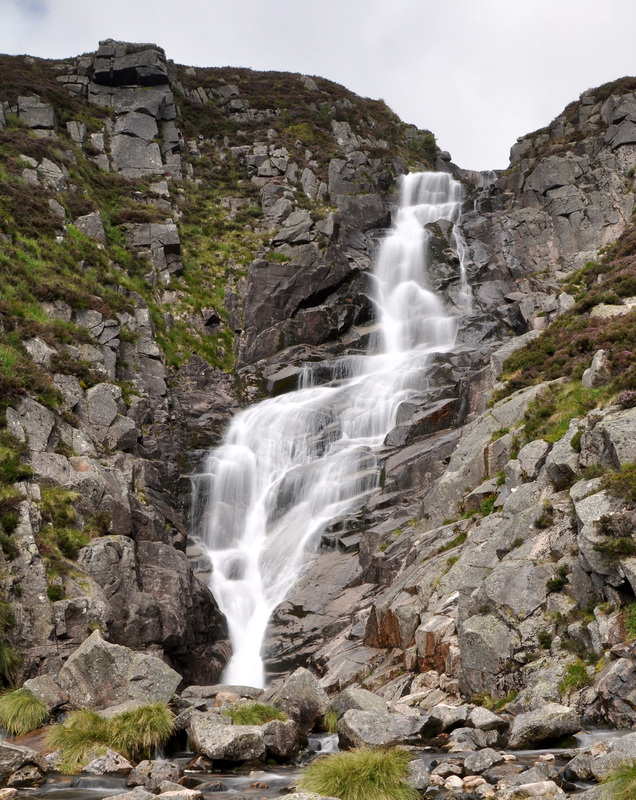
Panning is an artistic effect created when a slower shutter speed of 1/15th to 1/60th is used to track a moving object like a car. This causes the car to stay in focus while its surroundings are completely blurred.Waterfalls 1/8th – 2 secondsCapturing fast-moving water with a longer shutter speed creates a visual effect of motion blur which does not exist in reality.Waterfalls 1/8th – 2 secondsCapturing fast-moving water with a longer shutter speed creates a visual effect of motion blur which does not exist in reality.
Panning is an artistic effect created when a slower shutter speed of 1/15th to 1/60th is used to track a moving object like a car. This causes the car to stay in focus while its surroundings are completely blurred.Waterfalls 1/8th – 2 secondsCapturing fast-moving water with a longer shutter speed creates a visual effect of motion blur which does not exist in reality.Waterfalls 1/8th – 2 secondsCapturing fast-moving water with a longer shutter speed creates a visual effect of motion blur which does not exist in reality.
Waterfall 1/6th, f/20, ISO 100.
Blurring Water half – 5 seconds
For slower moving water like ocean, lakes, and rivers you need to use a shutter speed slower than half a second to create dreamy landscapes and seascapes with silky, smooth water.
For slower moving water like ocean, lakes, and rivers you need to use a shutter speed slower than half a second to create dreamy landscapes and seascapes with silky, smooth water.
Slow Moving Water 4 seconds, f/6.3, ISO 100.
Fireworks 2-8 seconds
Capturing fireworks can be exceptionally difficult. A faster shutter speed yields a speck of light across a dark sky and a slower speed creates a blurry, overexposed image. Try using a 3-5 second shutter speed for optimal results.
Stars 15–25 seconds Like fireworks, shooting the stars requires balance. A faster shutter speed produces tiny and dim stars, but a longer shutter speed (over 30 seconds) produces a trail effect. For the brightest and clearest stars, try a shutter speed between 15 and 25 seconds.
Star Trails
Take advantage of the earth spinning on its axis by opening the shutter speed long enough to capture the star trail. This is often done with a 15-minute (or longer) shutter speed (exposure time). However, you can create the same effect digitally by taking a series of photos (100+) with a 30 seconds exposure each. Later, blend the images together using editing software to create a gorgeous trail effect.
Viktor Elizarov is a travel photographer and educator from Montreal, Canada. He travels around the world and shares his experiences on his popular travel photography blog. Visit Tutorials section of his blog for free tutorials (including original raw files) and free Lightroom presets.
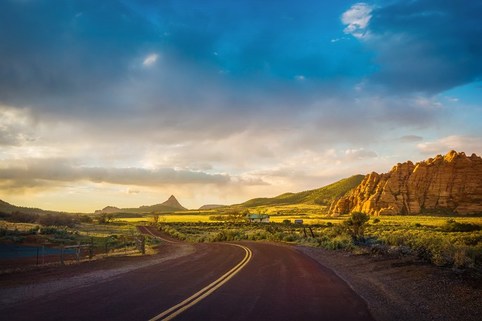
Five Ways to Improve Your Landscape Photography
Here I have reproduced an article from Picture Correct
Traveling photographer Jimmy McIntyre has been making quite a splash with his landscape photography.
1.Plan Everything (Yes, Everything!)
This might seem like a no-brainer and many of us know to go out to get the golden hour light and make sure it’s not raining, but how many of us really take it beyond that? There are many, many other things to take into consideration when getting the best landscape shots—everything from the sun and stars to when birds are migrating or tides will be coming in. Doing your research and planning accordingly will bring you one step closer to ensuring that you get the shots you’re hoping for. For celestial events, McIntyre likes to use Photographer’s Ephermis and/or PhotoPills, but there are plenty of others.
2. Use an ND Filter (10-Stop or Higher)
Neutral density filters are filters that enable longer exposure times by reducing the amount of light they lit into your camera. This can create amazing effects that aren’t easily recreated in post-processing. From capturing amazing cloud or water motion to transforming a tumultuous scene into something surreal and quiescent, they can really make your photos stand out from the crowd. Most people find that mastering 10-stop ND filters takes a lot of practice, but they’re well worth the effect.
Neutral density filters are filters that enable longer exposure times by reducing the amount of light they lit into your camera. This can create amazing effects that aren’t easily recreated in post-processing. From capturing amazing cloud or water motion to transforming a tumultuous scene into something surreal and quiescent, they can really make your photos stand out from the crowd. Most people find that mastering 10-stop ND filters takes a lot of practice, but they’re well worth the effect.
3. Get Down Low When Composing
A lot of photographers get a little lazy when it comes to their shots, taking them from a standing or kneeling position, yet a low shot can really shake things up a bit. McIntyre finds that this position helps to bring out the leading lines of the foreground.
A lot of photographers get a little lazy when it comes to their shots, taking them from a standing or kneeling position, yet a low shot can really shake things up a bit. McIntyre finds that this position helps to bring out the leading lines of the foreground.
4. Plan a Trip Around a New Moon Phase
If you’re into photographing celestial events, you’re probably already well-acquainted with this idea, as the new moon is clearly the best time to shoot the Milky Way. It just also happens to be a great time for low tides and, if you’re doing more than just celestial photography, you’ll get in at least one set of either morning or evening golden hour photography. Double win!
If you’re into photographing celestial events, you’re probably already well-acquainted with this idea, as the new moon is clearly the best time to shoot the Milky Way. It just also happens to be a great time for low tides and, if you’re doing more than just celestial photography, you’ll get in at least one set of either morning or evening golden hour photography. Double win!
5. Arrive Early
Another no-brainer, yet how many of us have found ourselves harried because we weren’t quite set up right when the magical moment we’d been waiting for appeared? Getting to your location early and getting fully set up with plenty of time to spare can make a huge difference in this part of things—it might even allow you to get bonus shots you weren’t expecting.
Another no-brainer, yet how many of us have found ourselves harried because we weren’t quite set up right when the magical moment we’d been waiting for appeared? Getting to your location early and getting fully set up with plenty of time to spare can make a huge difference in this part of things—it might even allow you to get bonus shots you weren’t expecting.
How to Photograph the Moon
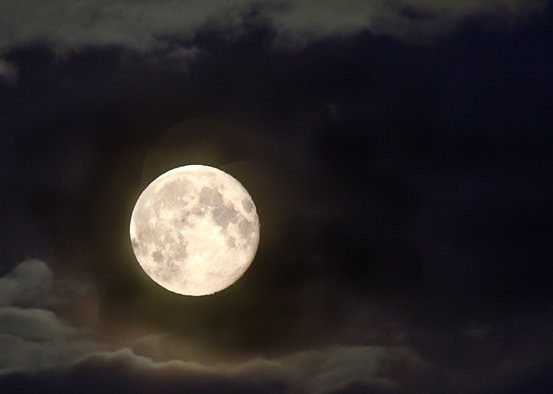
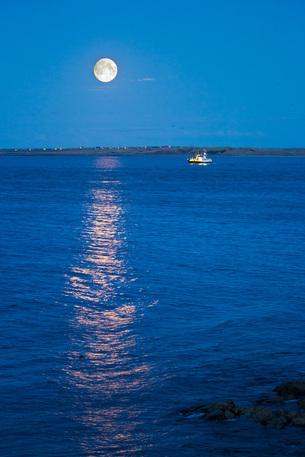
Overthe past few months several peopls have asked me 'How do I photograph the moon. When I try it comes out as a tiny white blob with none of detail you see with the naked eye'
This Monday morning 2.00 to 5.00 is a great time for phoyographing the moon. Not only is it at its biggest (it is about as close to the earth as it gets), but it is also in eclipse, it is passing through the earths shaddow. This will turn the mood into a reeddish orange colour.
so how do I aviod the little white blog syndrome? First have you got the right gear? You will need:-
If you want to enlarge the moon and show the details of the moon surface, a good telephoto lens longer than 200mm is almost required. At long focal lengths of 200mm and above, even a slight move can screw up the picture. That’s why if you are using a telephoto lens, a stable tripod is required to be able to produce a sharp image of the moon. Having a remote camera trigger also helps reduce the camera shake and if you have a Mirror Lock Up (MLU) feature in your camera, you can almost completely eliminate all vibrations.
Here are the settings you need:-
If you want an object in the foreground such as a tree, a rock or your house the only way to capture the scene with the moon properly exposed, is to take two separate shots of the scene – one with the foreground properly exposed and the moon overexposed and one with the moon properly exposed and the foreground objects heavily underexposed. You will then have to combine the images on your computer. The easiest way is to select and copy the moon (it will have a very dark background making the selection process easy) and them paste it ont your foreground image. It will need a bit of tweaking in Photoshop/Lightroom or a similar programme to get it right
With any luck you will get something better than this.
This Monday morning 2.00 to 5.00 is a great time for phoyographing the moon. Not only is it at its biggest (it is about as close to the earth as it gets), but it is also in eclipse, it is passing through the earths shaddow. This will turn the mood into a reeddish orange colour.
so how do I aviod the little white blog syndrome? First have you got the right gear? You will need:-
- A DSLR camera with a 200mm+ telephoto lens, the longer the lens the better, or a point and shoot camera that has an optical zoom capability.
- A stable tripod.
- Remote camera trigger (optional). If you do not have one, a timer in your camera will also work
If you want to enlarge the moon and show the details of the moon surface, a good telephoto lens longer than 200mm is almost required. At long focal lengths of 200mm and above, even a slight move can screw up the picture. That’s why if you are using a telephoto lens, a stable tripod is required to be able to produce a sharp image of the moon. Having a remote camera trigger also helps reduce the camera shake and if you have a Mirror Lock Up (MLU) feature in your camera, you can almost completely eliminate all vibrations.
Here are the settings you need:-
- Camera Mode: Set your camera mode to full Manual Mode.
- ISO: Set your ISO to 100 if you have a Canon DSLR and to 200 if you have a Nikon DSLR (basically, whatever is the lowest ISO you have in your camera). For most other brands, the base ISO is also 100. If you have a point and shoot camera, see if you can find a menu setting to set your ISO to 100. Make sure “Auto ISO” is turned Off.
- Aperture: Set your aperture to f/11.
- Shutter Speed: Set your shutter speed to 1/125 on cameras with base ISO 100, and to 1/250 on Nikon DSLRs with base ISO 200.
- Lens Focus: Set your lens to manual focus (either through a switch on the lens or on the camera) and set your focus to infinity. Be careful while setting the focus to infinity, as some lenses allow focusing beyond infinity. On modern DLSR's there is a handy feature called “live-view" which can accurately acquire focus on objects. You can use live view on auto focus or better on manual focus with the live view zoomed in. You will have to loo in your camera manual to see if you can do this. If you do not have such a feature in your camera, then try setting your lens to the center of the infinity sign, then take a picture and see if it came out sharp by zooming in the rear LCD of the camera.
If you want an object in the foreground such as a tree, a rock or your house the only way to capture the scene with the moon properly exposed, is to take two separate shots of the scene – one with the foreground properly exposed and the moon overexposed and one with the moon properly exposed and the foreground objects heavily underexposed. You will then have to combine the images on your computer. The easiest way is to select and copy the moon (it will have a very dark background making the selection process easy) and them paste it ont your foreground image. It will need a bit of tweaking in Photoshop/Lightroom or a similar programme to get it right
With any luck you will get something better than this.
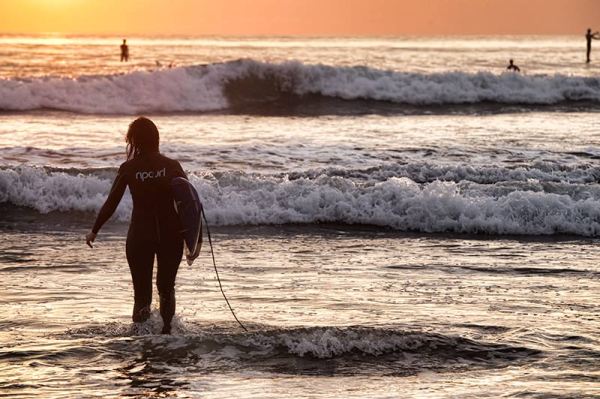
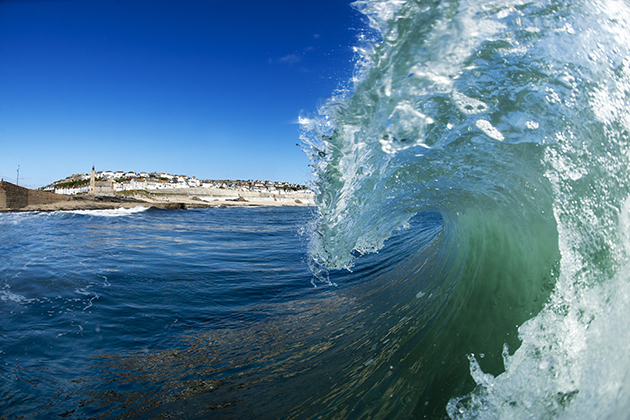
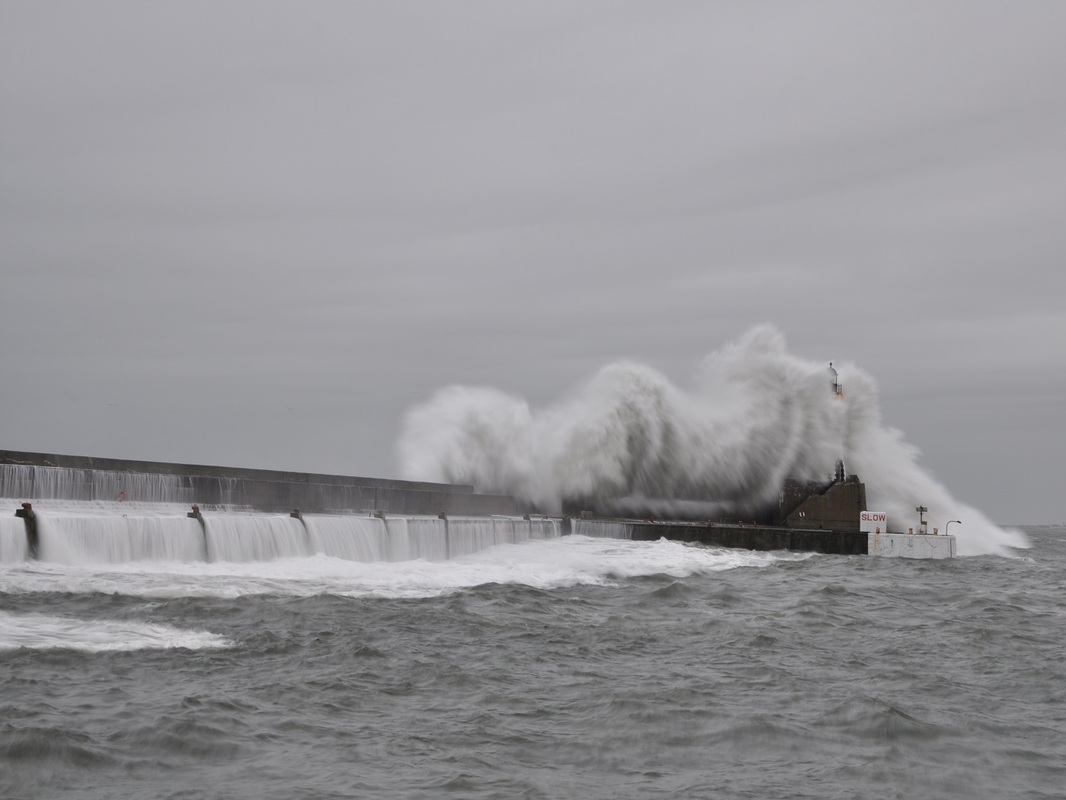
Shooting inside the waves
Fraserburgh is known as the 'Home of Scottish Surfing' and we get plenty of wave actiob on the beach. Here is an article taken from Amature Photographer which may help those wanting to take photos of these great waves.
Photographer Mike Lacey, from Porthleven in Cornwall, has been shooting waves for the past four years.
Mike, 28, told AP: ‘I’ve been interested in taking photos from a young age.
‘I used to skateboard and this is when I started playing with my mum’s camera, trying to get some funky angles of skateboarders.
Mike added: ‘My love for skating turned into a love of surfing and as soon as I was in the waves I wanted to document them.
‘But getting all the gear was quite expensive, so it took a while for me to be able to take shots from the water.
Mike said he uses a Nikon D800 or D3S DSLR, with 16mm fisheye, 50mm f/1.4, 85mm f/1.8 or 70-200mm f/2.8 lenses.
He protects his gear using SPL and AquaTech water housings.
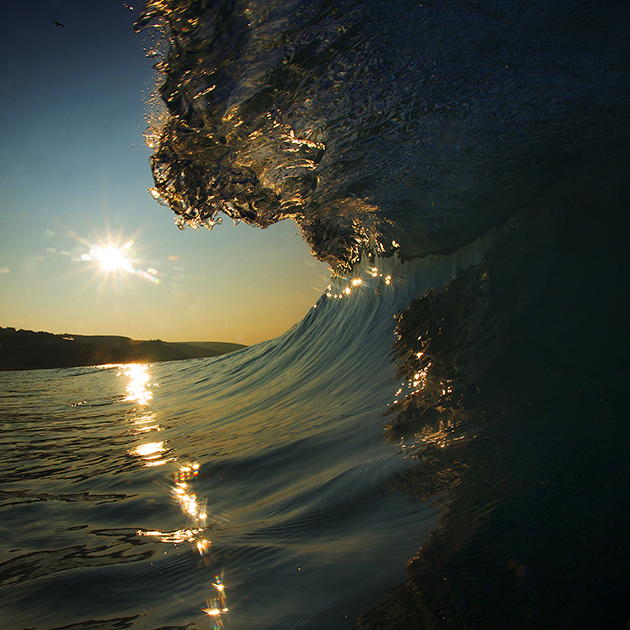
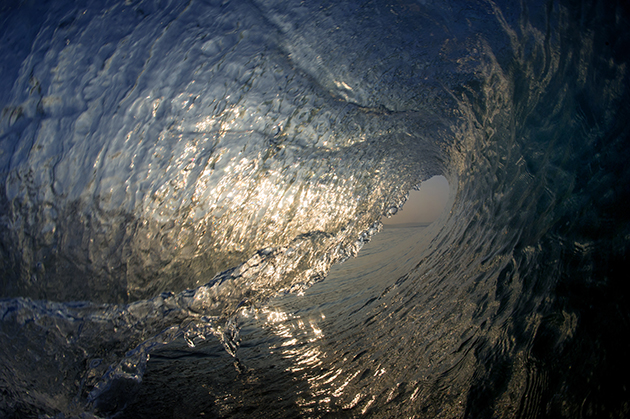
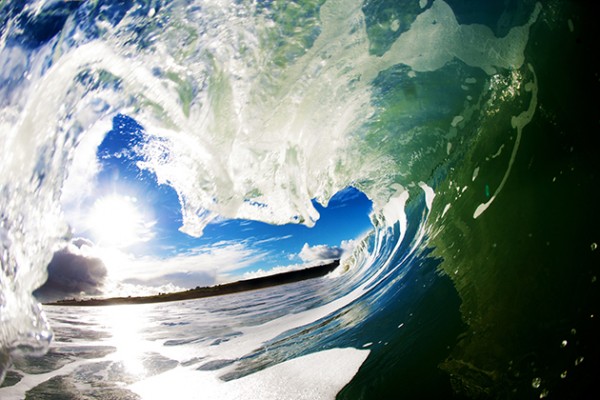
‘My knowledge of the waves from surfing for the past 13 years means I can get myself in the right spot to take these photos.’
Mike’s work was also published in The Times last week.
He told the newspaper: ‘I love that each wave, once broken, will never break again, so to be inside the wave at that point, to capture something that is there for a split second and then gone forever, is so special.
‘There might be only a few spots which will barrel for an hour or so at a certain point in the tide, so you really have to be able to drop everything and go when it looks good.’
To view more of Mike Lacey’s work, visit www.wavesgallery.co.uk.
Read more at http://www.amateurphotographer.co.uk/latest/photo-news/skateboarder-turns-photographer-to-make-living-by-capturing-barrelling-waves-46336#bhrSXmFHevcZuyyR.99
confused by 'sharpening'?
Most digital images need sharpening to correct the softening that occurs as a result of the demosaicing process and (in many cases) the presence of an anti-aliasing filter a camera’s sensor. Here is a link to an article from Digital Camera World that may help you to understand what it is all about.
Now you have read that here is a different way of sharpening your image - using the 'High Pass' filter in Photoshop and Elements. Here is a link to another article, this time from Digital Photography School that explains how and why to use the High Pass method of sharpening
Now you are all asking 'How can you sharpen in Lightroom?' Well you can and here is another link to a Digital Photography School article that will help you.
5 tips to get better portraits

Next Thursday (23rd October 2014) it is Portrait Night at Fraserburgh Photographic Society. The following week members submit images for the themed competition 'People'. So what better time is there to publish some tips on getting good portraits
Number 1 Occupy the Hands
Portrait photography primarily involves a head and shoulders shot. One of the primary stressors for the subject is what to do with the hands. Giving the person something to hold will keep their mind away from concentrating on their posture, resulting in a much more relaxed piece of work. Since some portraits may be full body photos, including an object that is comfortable but not distracting can put the subject at ease.
Number 2 Use a Chair
For some reason, people are uncomfortable standing in front of a camera. Consequently, portrait photographers will usually have a chair available. A chair could possibly be the handiest tool a photographer can have when taking portrait images. With this prop, there exists more of a casual atmosphere.
Number 3 Know Your Subject
Your subject has an idea in their mind what a portrait should look like. It is the portrait photographer’s responsibility to utilize their professional skills to bring the subject’s ideas to reality. Allow some interaction time so you can talk about subjects of interest or about the things your model is passionate about. You will be amazed how that special glint in the eye will come through and their face will light up.
Number 4 Involve Your Subject
The portrait photographer needs to remember that this is the client’s portrait and not that of the photographer. Respect for the individuals involved is mandatory. You should be aware of any time constraints the client might have. And you should also have a good understanding as to what the subject wishes.
If you are trying something the subject does not understand, be sure to explain why you are taking such actions. You do not want to catch your clients off guard, as that confusion will end up appearing in the final product.
Number 5 Be Prepared
Be sure all equipment is set up and in good working order prior to your subject’s arrival. Nothing will raise the level of anxiety more than having the client suffer through times of setting up proper lighting and ensuring everything is working. Find out some general information about the subject of the shoot. What are they anticipating from this session? Is the scene free from external distractions? Allowing the appropriate amount of time for the shoot will prevent rushing to complete the task at hand and will leave the photographer with a much happier customer.
In portrait photography, all five tips above are essential if you desire your subjects or clients to be more at ease in front of the camera resulting in the most natural portraits possible.
These tips were written by Raleigh Conrad and published on line by http://www.picturecorrect.com/
Images by Mike Chandler

Amateur Photographer’s Essential Guide to Freelensing by Phil Hall
Guide to freelensing: Discover how to achieve creamy defocused effects without a dedicated tilt-and-shift lens or Photoshop
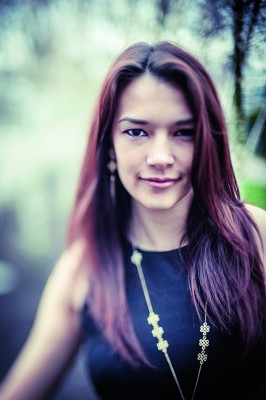
Image by Phil Hall
Freelensing is pretty much exactly what it sounds like. In essence it involves taking the lens off your camera and holding it up to the lens mount.
By slightly – and that’s very slightly, no more than a few millimetres – angling the lens away from the camera body it’s possible to shift the focal plane in weird and wonderful directions.
It may sound simple, but in practice it’s a tricky and subtle technique to pull off. It’s easy to let too much light into the camera, and if you’re not careful you’re also running the risk of dust getting inside the camera.
The key is planning, and knowing what you’re doing before you start. With that in mind, we’ve put together a step-by-step guide to the best and safest way to achieve creative results from freelensing.
Equipment
The best lens for freelensing depends on what camera you’re working with. If you’ve got a full-frame DSLR, a 50mm prime is your best bet. If you’re working with APS-C, a 35mm or similar should be just fine.
The important thing is to avoid zoom lenses. Stick with a fast prime – you’ll get fast maximum apertures and less vignetting.
Can I use long focal lengths?
Yes, if you’re steady-handed. You’re running a much higher risk of lens-shake affecting your image with longer lenses, but it’s possible to produce some stunning effects.
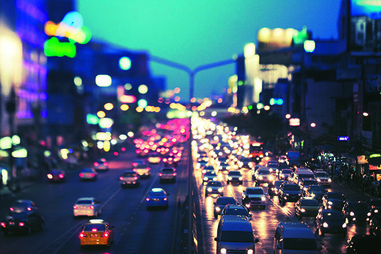
Image by David Tang
This shot by photographer David Tang makes use of a moderate telephoto lens to create the miniaturisation effect on the cars below.
What about wideangles?
Again, not saying no, but it can be tricky to see exactly what – if anything – you’ve got in focus. Vignetting is also a more pronounced issue.
Since the lens and camera don’t need to attach, can I mix and match brands?
Absolutely. It may surprise you to learn that using glass from a different manufacturer to that of your camera can actually make freelensing more successful. Some people prefer to use Nikon primes on a Canon DSLR for instance, as they’re more suited for focusing on distant subjects. This is because the flange focal distance (the distance between the sensor and the mounting flange) on a Canon DSLR is 44mm compared to 46.5mm for a Nikon.
The Set Up
First off, set your camera’s drive mode to continuous. There’s an element of trial and error to freelensing, especially when you first start, and every slight movement of the lens is going to alter focus. You’ll have a much greater chance of bagging the shot you want if you’re firing off in quick succession. Make sure you’re shooting raw and set to manual mode. Dial in the correct exposure for the scene with the aperture setting matching the maximum aperture of the lens.
If your lens has an aperture ring, set it to the maximum aperture and set focus to infinity. You’ll find it much easier to find focus by gently tilting the lens back and forth rather than trying to manually adjust focus one-handed.
Start shooting
Probably the number one thing to keep in mind when trying out freelensing is that very small movements are all that’s necessary to make a very big difference. We’re really talking just a couple of millimetres to alter the plane of focus, and the more you tilt the lens the more pronounced the blur will be. Tilting the lens to the right will mean the left side of the frame retains focus, tilting downwards will mean the top area retains focus and so on.
Some may prefer to stick with the viewfinder for compositional purposes, however live view can be a much easier way of monitoring what’s in focus. Experiment with what feels most comfortable.
Image by Oli Sansom
Can I experiment by varying the distance between camera and lens?
By moving the lens further away from the mount, you can focus much more closely to your subject than would be possible when the lens is attached. For ultra close-up shots you can even reverse the lens to properly magnify your subject.
There are a couple of issues to be aware of here. The first is dust – having the sensor exposed carries with it the risk of dust incursion, and this is magnified the further away you move the lens.
Be mindful of how much time you spend with your sensor exposed, and where possible try to shoot in an environment that’s as clean as possible.
The second issue is light leak. Once the lens gets further away from the mount, the possibility of light creeping in around the edges increases.
While it can easily cause flare that can wreck an image, light leak can also lend a lovely vintage look to certain shots. Just be careful – it’s easy to overdo it.
Matt Osborne provides a helpful tip for reducing light leak – cup the lens from the side where the strongest light is coming from.
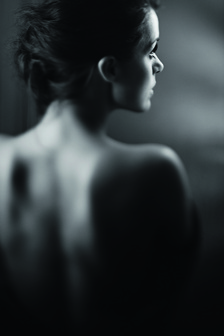
Image by Matt Osbourne
Freelensing is the kind of technique that only gets better and better with practice.
Join a freelensing group on Flickr to share tips and images with likeminded photographers, or share your results in the AP Gallery.
Read more at http://www.amateurphotographer.co.uk/technique/aps-essential-guide-to-freelensing-5948#JaXgfhRwBEUOi7tJ.99
Join a freelensing group on Flickr to share tips and images with likeminded photographers, or share your results in the AP Gallery.
Read more at http://www.amateurphotographer.co.uk/technique/aps-essential-guide-to-freelensing-5948#JaXgfhRwBEUOi7tJ.99
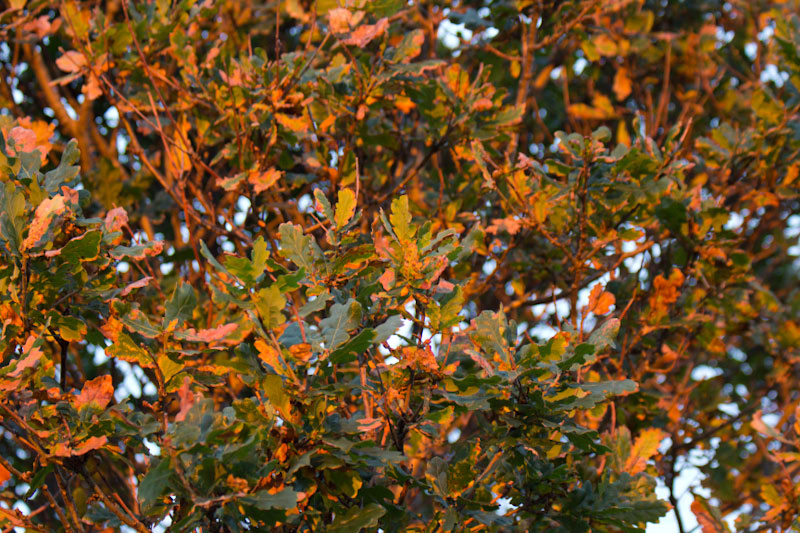
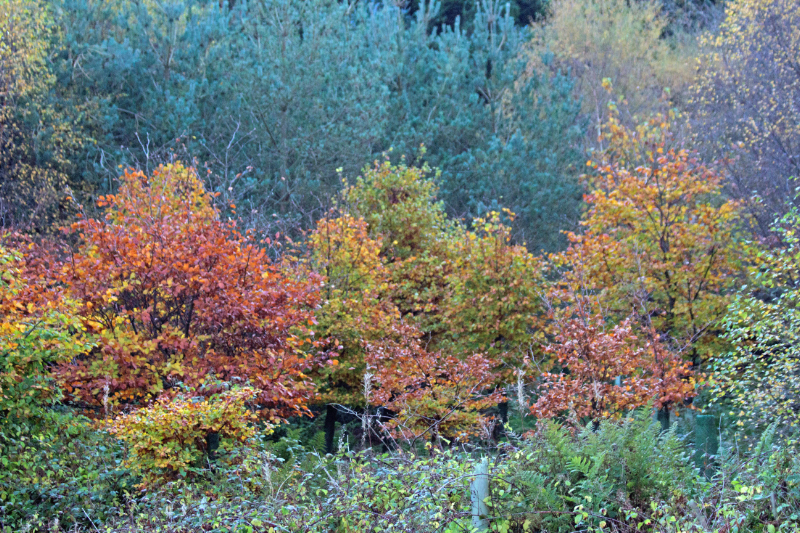
Getting the Best of Autumn Colour
Taking pictures of autumn colours is one of the favourite activities for photographers at this time of year. Here are some tips to make sure yours turn out well.
1) Where and When is the most colour to be found?
It goes without saying the you should take your autumn pictures when the colours are at their best. Find out where to go by going to the Visit Woods web site and following the advanced search which under 'features' has an autumn colour button, add your post code and how far you want to travel to get a list of possibilities.
The timing of the change from green to gold and yellow and red is never the same one year after the next. Different trees make the change at different times. Take to the web sites again. In England the Forestry Commission have an up to date colour coded map that says where the best colour is. In Scotland the Forestry Commission put up current picture on their map so you can see what it is like. Unfortunately I cannot find anything that will do the same job in Wales.
2) Get off the beaten track.
Many of the well known woodlands will have been photographed many times and most often from the same view point or within feet of the car park. Find somewhere new by getting away from the crowds
3) Get the light right
The soft light of a misty foggy morning can saturate the colours, really making them stand out, and create a unique atmosphere in the photograph. The effect of drizzle on the leaves is often better than bright sunlight. The other advantage of going out early or when its wet is that you are less likely to be bothered by crowds, unless of course you have gone on a Fraserburgh Photographic Society Photo Shoot!
4) Don't forget reflections
You can get twice the colour if you find a still stretch of water and take the reflection of the trees as well. Or you could go for the more abstract and just take the reflection.

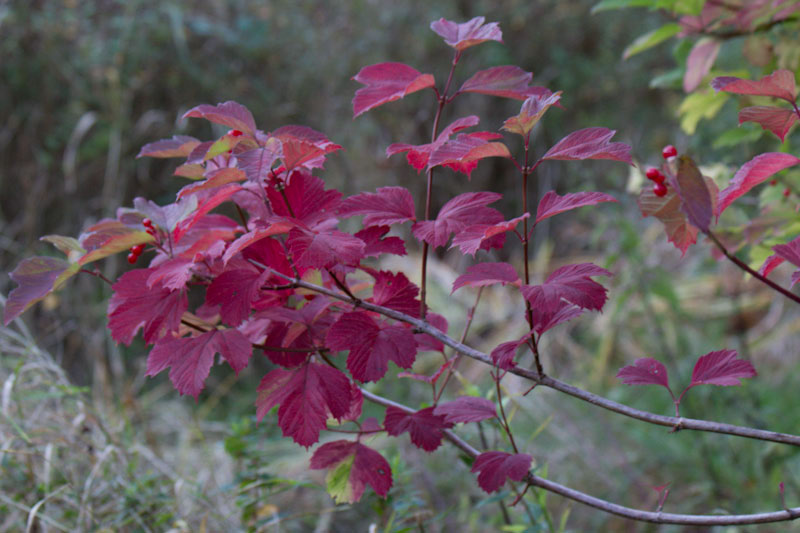


5) Move in Close
Autumn colours are not just about the whole landscape. Get in close to capture some of the detail be it a single leave or just one part of a tree where the leaves are just turning to the autumn yellows and golds.
6) Provide a Focal Point
Add something of interest into your autumn image so that it not just trees. You may be lucky and capture some wild life or you could take an natural shot of the family enjoying and autumn walk. Alternately you could set up the autumn picture you have always wanted to take. For inspiration go to Flickr and search 'autumn'
7) A polarizing filter will reduce the glare off shiny leaves and make colours more saturated.
8) I know everyone won't agree with this but in post processing I believe that with autumn colours it is far too tempting to push the saturation slider too far. Let the natural colours them speak for themselves they are very very good at it.
All the photos in this article are by Mike Chandler. Please post your Autumn Colour pictures on the Fraserburgh Photographic Society Facebook page for all to enjoy.
Submitted by Paul Woodburn
Flash
Lots of people have problems with flash, especially on camera flash and especially on compact cameras.
The flash will always light the nearest object the brightest, so avoid taking shots near pillars, corners or non subject people at the side of the frame.
If you can arrange everyone or things you wish to photograph to be at an equal distance from the camera this would be the best results. Also avoid a background of mirrors or their reflective surfaces.
See photograph “A” the subject is behind a door post, photograph “B” the subject is one step forward of the door frame.
Red Eye
This is caused by the flash bouncing of the back of the eye, the lighting is usually low if you have to use flash so the pupils of the eye are wide open. There are cameras that try to overcome this by flashing several times before the shutter opens, this works some of the time, but with children they can see the flash think it’s all over and their off.
I find with children that it is better to correct the red eye in software if you can. There are cameras on the market that contain software to do this job.
SLR cameras are better especially with off camera flashes as the flash is not in line with the eye.
Pet Photography
Mike Chandlers Top Tips for Photographing Pet’. Mike is the press agent for Fraserburgh Photographic Society and was the inaugural winner of the Stanley Partridge trophy for the best in prints and themed competitions this year
1) Give your image some real impact. Take your photograph at the pets’ level. Either get down on the floor or get the pet onto a table.
2) Focus on the eye closest to you. The automatic focus on cameras usually focuses of the thing nearest to the camera. With a pet this is often the nose. When you look at a pet (or person for that matter) portrait you automatically concentrate on the eyes so this is where the point of focus should be
3) If you can get outside and capture your pet in action.
4) If you have to stay indoors try not to use the cameras flash. It gives a harsh light and casts shadows.
5) Capture the animals’ character. Don’t try to get a lazy dog to jump over fences or get an active one to sit still! Or if your cat sleeps for most of the day maybe that’s how you should take you photo.
6) Make sure you keep an eye on the background. Try to avoid clutter and bright objects in the background because they will distract from the main subject, your pet.
7) Try something different, get in close and fill the frame or stand back and get your pets’ best friend in the shot as well.


ND Filters
This time the photo tip comes from Ally Henderson the Fraserburgh Photographic Society ‘Photographer of the year’. This title is awarded to the Society member who scores the highest total points score from the six open competitions held in the year.
Neutral Density Filters.
Anyone who finds they are into photography sooner or later will find themselves using filters .Filters are many and varied and with the exception of a polarising filter , ND.s are the most interesting whether plain or Graduated.
Coming in different exposure factors, being 2X - 1 stop
4X - 2 stops
8X - 3 stops
64 X - 6 stops
and 1024X - 10 stops known as the Big Stopper.
Any landscape photographer will carry some or all in his bag .
ND,s are neutral grey and as such any light passing through them is only affected by brightness not colour and are used primarily to slow down shutter speeds to blur motion in moving water or clouds and it is in landscapes and seascapes they show their true worth .
They come in two forms ,screw in ones in various thread sizes and the slot in type which slide into a holder screwed onto the lens thread and although technically sounding are fairly simple to use with most digital cameras with a filter thread on the lens and proper manual settings . Other requirements are ,a tripod and wireless or cable remote to prevent camera shake ..
If taking a waterfall or seascape use different strengths until you achieve the desired blurring ,use manual mode and different apertures and the higher the f no. the longer the exposure and the more milky the effect , and in no time you will see the advantage of using them .

Landscapes Composition
Landscape composition
Many people will be taking pictures of landscapes. Be it on holiday to capture the views of faraway lands or to get great images of our fantastic local scenery. Following a few simple rules will help improve the image and make a snap into a picture.
Rule of Thirds
Imagine what you see in the view finder, or on the LCD screen, is divided up with four lines, like a noughts and crosses grid (into thirds) so you have nine squares in the picture. Many cameras will have a function that actually put the lines on the screen so you don’t have to imagine them. Now instead of placing the main part of the picture you want to take in the middle of the screen place it as near as possible to where two of the lines cross. This will give the shot better balance and be more pleasing to the eye. If you have a natural line in your picture, the horizon or a distant mountain range put that as near as possible on one of the lines rather than across the centre of the frame.
Leading Lines
Try to compose the picture so that there is a lead into the frame and towards your main subject. It could be a winding road, a fence, rocks on the shore or a wave patterns in the sand.
Depth
To get the feeling of depth in your picture think about getting a strong foreground, for example one of those big round bails of straw or some brightly coloured flowers. Then try to get some middle ground in the image. This will often be your main subject. And finally make sure you have a background. It is better to have fluffy white clouds in the sky rather than an expanse of blue or grey. Distant mountains or buildings are good for background as well.
Framing
A variation on getting a good foreground is to get a frame round your main subject. This can be a simple as having the leafy branch of a tree in the foreground across the top of your picture to taking the shot though a natural or artificial hole. A window frame the arch of a bridge or a rainbow would do.
Odds
The human brain is a funny thing. We seem to find odd numbers easier on the eye than even numbers. Three sheep in the foreground is better than four, three wind turbines on a distant hill is more pleasing to the eye than two (regardless of what you think about them in the first place).
Diagonals
Diagonal lines though the frame work well. They are more dynamic than horizontal or vertical lines. If you have a breakwater in the picture get it to go out from the bottom left corner of the frame not straight out from the middle. Put a stripy pattern on a slant. A bridges is another subject that generally looks better if taken from an angle rather than straight on. A note of caution, horizons should invariably be straight. Even if they are a little bit out, it shows.
Finally remember that these are not rules but guidelines and can be broken. But if you do break them know that you are breaking them , and have a good reason for doing so.
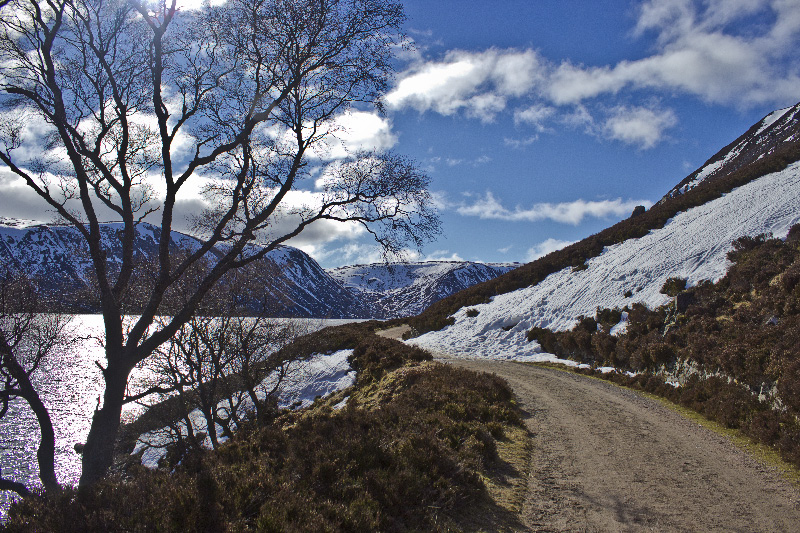
Loch Muick
